If you’re looking for offline, hands-on, arts and crafts activities, try building this 3D models from recycled paper painted with metallic acrylic paint to make it stunning and beautiful. It’s a fun way where creative crafting meets geometry exploration with an eco-friendly twist. For teachers and educators this is a guide to help your students learn geometry concepts via the project based learning the practical application of measuring toolsб art supplies and recyled materials to make it a fun and creative learning process. You can also make a festive holiday decoration or a unique gift! These are great projects for both kids and adults.
Project Materials
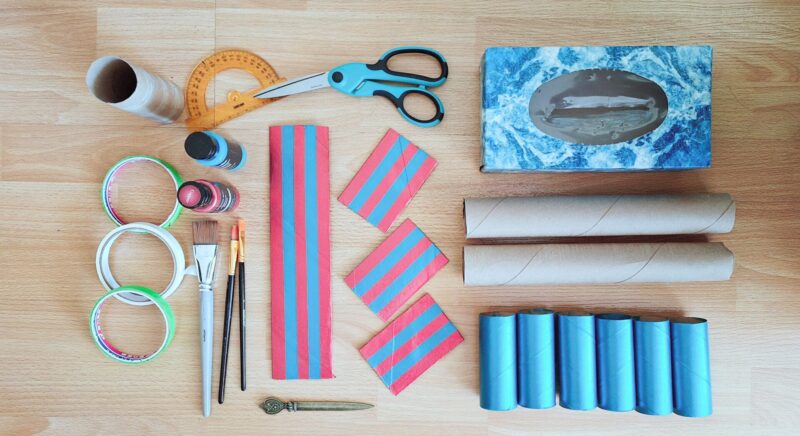 To build a Dodecahedron or Icosidodecahedron model, 30 individual pieces are required per single model. The number of pieces each type of material may produce can vary slightly. This will require a bit of experimentation, but this is the ballpark from our experience:
- 6 Toilet paper rolls
- Each roll typically produces 5–6 individual pieces.
- 2 Paper towel rolls
- Each roll is about three times as long as toilet paper roll and can yield around 18 pieces.
- 3-4 Tissue paper boxes
- Used for larger models.
- Pieces can be cut from either the top (wider) section or side (narrower) panels.
- Each box may produce 8–10 pieces depending on the section used.
Tools and Supplies
- Required
- Protractor, Pencil, and Ruler
- Large Sharp Scissors able to cut thick carton
- Recommended
- Guillotine Paper Cutter for the best experience and straight, sharp edges
- Scoring/Creasing tool or Letter opener (tip of a nail file works great as well, this is optional but we prefer scoring as it does not leave any pencil marks)
- Electric Iron with steamer (very helpful for flattening, plus it takes care of any hygiene concerns regarding working with toilet paper rolls)
- Metallic Acrylic Paint and Paint Brushes
- Masking Tape (required for multi color versions)
- Non-stick parchment paper (if ironing already painted paper rolls to protect the paint and the iron)
Create Individual Units
- Paint Paper rolls first (Optional)
- It’s easier to paint the rolls while they’re still round.
- Allow fully dry before continuing to the next step.
- You may need multiple coats, let each coat fully dry before applying the next coat.
- Flatten the Rolls
- Press each roll flat by hand or use warm iron
- If you’re using an iron, cover the painted roll with a piece of non-stick parchment paper to protect the paint and the iron.
- Measure & Cut
- Place flattened paper roll on your workin surface horisontally
- Using a protractor, mark a 72° angle from the top right corner of the flattened roll, then mark the angled line using pencil or a scoring tool.
- Measure the the angled line and divide it by 5 to calculate the width of individual piece. The width of the piece equials 1/5 of the length, minus a mm or so for some wiggle room.
- Mark the width of the individual peices on the top and bottom edges of the papaer roll and use a pencil or a scoring tool to connect the marks for the rest of the pieces.
- Repeat for all paper rolls until you have marked 30 identical pieces.
- Cut the pieces using scisors or guilliotine paper cutter for clearner look and straight edges.
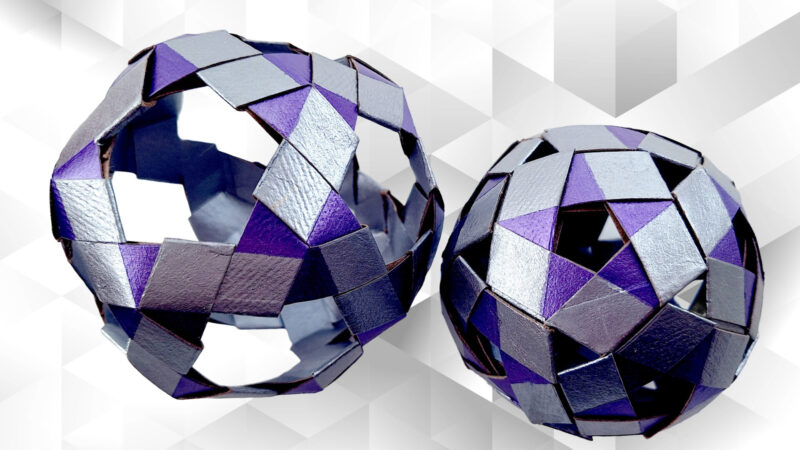
Model Assembly
Model 1 – Dodecahedron
- Start by joining three pieces into a triangular interlock to form a first vertex.
- Keep adding vertices until the pentagon shaped opening is formed, it takes 10 pieces.
- Keep adding pentagon shapes until the model naturally closes up and all 30 pieces are used.
- When finishing off the model you need to detach and re-attach the end of the last piece on the back to close up the model. The only step where the glue or clear tape is requred
- The assembly process is based on priciples of a flat model 1 with the differnce that we are making pentagon shaped openings and using 72 Degree angle cut pieces so the structure starts to curve.
Model 2 – Icosidodehadron
- Start by making a pentagon shaped opening using 5 pieces
- The assembly process is based on priciples of a flat model 2 with the differnce that we are making pentagon shaped openings and using 72 Degree angle cut pieces so the structure starts to curve.
- Watch the videos of the entire process for visual instructions on our YouTube channel.
- Decorate & Display
- Tie a string through one of the openings to hang as a Christmas ornament.
- Combine multiple for a garland.
- Ask your friend for their favorite colors and build a multicolored version to give as a gift
- Enjoy at home or in the classroom for holiday décor or year-round geometric fun.
Watch Video

Did you try this pattern?
Leave a comment below. We would love to see your work! Take a picture of your masterpiece and attach it to your comment. Are you following us on Instagram? Follow us and tag us with our Instagram handler @geomegic to have your work featured on our feed.